GALAXY ACE

HD GAMES,APPS,ROMS AND MANY MORE FOR GALAXY ACE AND OTHERS ANDROID MOBILES

FREE FULL VERSION GAMES, ANTIVRUS,SOFTWARES ETC....

Free latest softwares, games, antivrus, windows 7 and xp hacks tricks, multimedia softwares and many more at www.latestpchacks.blogspot.com

FULL VERSION SOFTWRES AND ANTIVIRUS FOR FREE

Free latest softwares, games, antivrus, windows 7 and xp hacks tricks, multimedia softwares and many more at www.latestpchacks.blogspot.com

FREE MULTIMEDIA SOFTWARES AND UTILITIES FOR YOUR PC

Free latest softwares, games, antivrus, windows 7 and xp hacks tricks, multimedia softwares and many more at www.latestpchacks.blogspot.com

HACKING TOOLS AND NETWORKING TUTORIALS AND MUCH MORE

Free latest softwares, games, antivrus, windows 7 and xp hacks tricks, multimedia softwares and many more at www.latestpchacks.blogspot.com

Showing posts with label TRICKS. Show all posts

Friday, December 27, 2013

How to Hack WiFi Password (WEP/WPA/WPA2/+PSK)

How to Hack WiFi Password (WEP/WPA/WPA2/+PSK) UPDATED WORKING 100%

NEW - WORKING 100%. The Beini which didn't worked is replaced and all fine now... Enjoy hacking

If you are living nearby someones WiFi hotspot and every time your laptop search for connection its showing up but you don't have passwords. Or you just want to steal someones WPA/WPA2 Wi-Fi hotpots key or passwords. Don't worry...


In this tutorial I’ll show How to hack a WPA/WPA2 Wi-Fi connection through a bootable USB.


THINGS YOU WILL NEED -: 


1. A USB pen drive.

2. beini.iso file. [Download beini.iso]

3. UNetbootin software to make your USB drive bootable. [Download UnetBootin for Windows, Mac or Linux]

4. A Dictinary File For WPA 2 Crack
[Best Dictionaries Ever On Internet]


Some few steps you would have to do (WEP):


1. Write beini.iso on your USB by UNetbootin. Set everything according to this image below.


2. After finishing restart your PC and boot it from your USB.


3. If you were successful to boot up then you should see something like this. Click Minidwep-gtk.


4. Click OK.


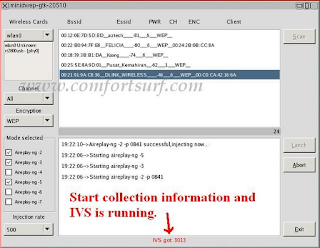
5. Now Minipwep-gtk  program will open. Click Scan.


6. Select a wireless network(should have Client) from the list. And click Launch to start cracking process.


7. Sometimes it take a while according to your victim connections, IVS value and password strength. So keep patience.


8. If it finds a password, it should appear like this.


To crack WPA/WPA2 follow this image instruction.

RESTART YOUR PC AND BOOT FROM YOUR OS THEN ENTER THE FOUND PASSWORD..

Top 10 keyboard shortcuts everyone should know

Top 10 keyboard shortcuts

Using keyboard shortcuts can greatly increase your productivity, reduce repetitive strain, and help keep you focused. For example, highlighting text with the keyboard and pressing Ctrl + C is much faster than taking your hand from the keyboard, highlighting the text using the mouse, clicking copy from the file menu, and then putting your hand back in place on the keyboard. Below are our top 10 keyboard shortcuts we recommend everyone memorize and use.

Ctrl + C or Ctrl + Insert

Copy the highlighted text or selected item.

Ctrl + V or Shift + Insert

Paste the text or object that's in the clipboard.

Ctrl + Z and Ctrl + Y

Undo any change. For example, if you cut text, pressing this will undo it. This can also often be pressed multiple times to undo multiple changes. Pressing Ctrl + Y would redo the undo.

Ctrl + F

Open the Find in any program. This includes your Internet browser to find text on the current page.

Alt + Tab or Alt + Esc

Quickly switch between open programs moving forward.

Tip: Press Ctrl + Tab to switch between tabs in a program.

Tip: Adding the Shift key to Alt + Tab or Ctrl + Tab will move backwards. For example, if you are pressing Alt + Tab and pass the program you want to switch to, press Alt + Shift + Tab to move backwards to that program.

Tip: Windows Vista and 7 users can also press the Windows Key + Tab to switch through open programs in a full screenshot of the Window.

Ctrl + Back space and Ctrl + Left or Right arrow

Pressing Ctrl + Backspace will delete a full word at a time instead of a single character.

Holding down the Ctrl key while pressing the left or right arrow will move the cursor one word at a time instead of one character at a time. If you wanted to highlight one word at a time you can hold down Ctrl + Shift and then press the left or right arrow key to move one word at a time in that direction while highlighting each word.

Ctrl + S

While working on a document or other file in almost every program pressing Ctrl + S will save that file. This shortcut key should be used frequently anytime you're working on anything important.

Ctrl + Home or Ctrl + End

Move the cursor to the beginning or end of a document.

Ctrl + P

Print the page being viewed. For example, the document in Microsoft Word or the web page in your Internet browser.

Page Up, Space bar, and Page Down

Pressing either the page up or page down key will move that page one page at a time in that direction. When browsing the Internet pressing the space bar will also move the page down one page at a time. If you press Shift and the Space bar the page will go up a page at a time.

Tip: If you are using the space bar to go down one page at a time press the Shift key and space bar to go up one page at a time.

Top 10 Internet tips and tricks


You don't need the http:// portion of a web page

When typing an Internet address you do not need to type http:// or even www. in the address. For example, if you wanted to visit Computer Hope you could just type computerhope.com and press enter. To make things even quicker, if you're visiting a .com address you can type computerhope and then press Ctrl + Enter to type out the full http://www.computerhope.com address.

Quickly move between the fields of a web page

If you're filling out an online form, e-mail, or other text field you can quickly move between each of the fields by pressing the Tab key or Shift + Tab to move back a field. For example, if you're filling out your name and the next field is your e-mail address you can press the Tab key to switch to the e-mail field.

Tip: This tip also applies to the buttons, if you press tab and the web developer has designed correctly the button should be selected and will allow you to press the space bar or enter to push the button.

Tip: If you have a drop-down box that lists every country or every state you can click that box and then press the letter of the state or country you're looking for. For example, is a drop-down box of States in the United States you could press u on the keyboard to quickly scroll to Utah.

Use Internet search engines to their full potential

Make sure to get the most out of every search result. If you're not finding what you want try surrounding the text in quotes. For example, if you were searching for 'computer help' this actually searches for pages that contain both computer and help and not necessarily pages that have computer and help next to each other. If you search for "computer help" with the quotes around the search query this will only return pages that actually have computer and help next to each other.

Tip: Many new computer users also don't realize that in every search box you can press enter instead of having to move the mouse button over to the Search button.

Top 10 unknown Google tricks
Protect yourself and avoid bad web sites

How can I protect myself while online?
Avoid Internet phishing.
Protecting children from harmful material and people on the Internet.
Know your Internet browser shortcuts

There are dozens of different shortcut keys that can be used with Internet browsers. Below are a few of our top suggested Internet browser shortcuts.

- Pressing Alt + D in any major Internet browser will move the cursor into the address bar. This is a great way to quickly enter an Internet address without having to click the mouse cursor in the address bar.
- Hold down the Ctrl key and press the + or - to increase and decrease the size of text.
- Press the backspace key or hold down the Alt key + left arrow to go back a page.
- Press F5 to refresh or reload a web page.
- Press F11 to make the Internet browser screen full screen. Press F11 again to return back to the normal view.
- Press Ctrl + B to open your Internet bookmarks.
- Press Ctrl + F to open the find box in the browser to search for text within the web page you're looking at.

Full listing of Internet Explorer shortcut keys.
Full listing of Mozilla Firefox shortcut keys.
Take advantage of tabbed browsing

Take full advantage of tabbed browsing in all Internet browsers today. While reading any web page if you come across a link you may be interested in open that link in a new tab so it can be viewed later. A new tab can be opened by holding down the Ctrl key and clicking the link or if you have a mouse with a wheel click the link with the middle mouse button.

Try alternative browsers

Most computer users use the default browser that comes included with the computer, with Microsoft Windows this is Internet Explorer. There are several great alternative browsers that are all free to download and use and may have features your current browser does not include. Below are a few of our favorites, try one or try them all.

Google Chrome
Mozilla Firefox
Opera
Install plugins and add-ons

Each of the above alternative browsers also have a large community of volunteers who develop add-ons and plugins that can be added into the browser. Each of these browsers have hundreds of thousands of these add-ons that can do such things as giving you live weather in your browser window, changing its color, and adding additional functionality.

Top 10 Firefox add-ons
Make sure your browser and its plugins are up-to-date

Each Internet browser can have several additional plugins that give it additional functionality. For example, Adobe Flash is a great way to bring movies and other animated content to the Internet. Keeping these plugins up-to-date is vital for your computer stability and also security. Using the below tool you can quickly verify if your plugins are up-to-date and get links to where to download the latest updates.

Computer Hope system information tool
Use online services

There are hundreds of free online services that can help make using your computer easier, more productive, and more enjoyable. See our top 10 online services for a listing of our favorites.

Top 10 Windows 8 tips and tricks


Customize your tiles
Make the most of your Windows Start screen tiles by adjusting the sizes, where they are located, and what is listed.
  • Move any tile by clicking and dragging the tile. While moving a tile, if you need a larger view of the Start screen move the tile towards the top or bottom of the screen to zoom out.
  • Use your mouse wheel to scroll left-to-right through your tiles.
  • Any Desktop shortcut or program can be pinned to the Start screen by right-clicking the icon and choosing Pin to Start.
  • In the bottom right-hand corner of the start screen is a magnifying glass with tiles, click this icon to get a zoomed out view of your Start screen. In this view, if you right-click on a group of tiles you'll be given the option to name group, which can be useful if you have a group of related tiles (e.g. games). In this view, you can also click and drag a group to organize your tile groups.
  • Create a new speed bump between tile groups by moving a tile to a speed bump.
  • Resize any User tile or Live tile by right-clicking the tile and choosing resize.
  • If there is a tile you want on your Taskbar, right-click the tile and choose Pin to taskbar.
  • Show admin applications on the Start screen by clicking Settings in Charms, click Settings, and change the Show administrative tools from No to Yes.
  • In Internet Explorer 10, you can also pin any of your favorite web pages to your Start Screen.
Windows 8 keyboard shortcuts
Knowing at least some of the Windows 8 keyboard shortcuts will make your Windows 8 experience much more enjoyable. Try to memorize these top Windows 8 shortcut keys.
  • Press the Windows key to open the Start screen or switch to the Desktop (if open).
  • Press the Windows key + D will open the Windows Desktop.
  • Press the Windows key + . to pin and unpin Windows apps on the side of the screen.
  • Press the Windows key + X to open the power user menu, which gives you access to many of the features most power users would want (e.g. Device Manager and Command Prompt).
  • Press the Windows key + C to open the Charms.
  • Press the Windows key + I to open the Settings, which is the same Settings found in Charms.
  • Press and hold the Windows key + Tab to show open apps.
  • Press the Windows key + Print screen to create a screen shot, which is automatically saved into your My Pictures folder.
See our Windows shortcuts page for a full listing of all Windows shortcuts.
Know your hot corners
The corners on your screen are hot corners and give you access to different Windows features. Below, is a brief explanation of each of these corners.
Bottom Left-hand corner
The bottom left-hand hot corner of the screen will allow you to access the Start screen, if you're in the Start screen and have the Desktop open, this corner will open the Desktop from the Start screen.
Tip: Right-clicking in the left hand corner will open the power user menu.
Top-left corner of the screen
Moving the mouse to the top-left corner and then down will display all the apps running on the computer. Clicking and dragging any of these apps to the left or right-hand side of the screen will snap that app to that side of the screen. Each of these open app icons can also be right-clicked to close or snap.
Right-hand side of the screen
On the full right-hand side of the screen will be given access to the Windows Charms.
Taking advantage of search
The Search in Windows 8 has been significantly improved when compared to all previous versions of Windows. To search for a file or run a program in Windows 8 from the Start screen just start typing what you're trying to find or want to run.
As you begin typing, the results will start appearing on the left-hand side. In addition to being able to search for files and run programs, the Search also supports limiting the search to apps such as Finance, People, Maps, Photos, Mail, Music, Videos, Weather, and much more. If what you are searching for is not a file or program, click on the app you wish to use as the search. For example, if you were searching for "New York" and selected the Weather App you would be shown the weather in New York, NY.
By default, Search organizes the available Apps by how frequently they are used and then in alphabetical order. If you want to keep your favorite app at the top of the Search list, right-click the app and choose Pin. Pinning the app will lock it in place regardless of how often it is used. If there is an app you don't want (e.g. Finance) you can turn on and off any of the search apps through the PC settings, which is found under the Settings in the Charms.
Bonus tip: The Search is also found through Charms and can also be opened by pressing Windows key + F.
Running two apps side by side
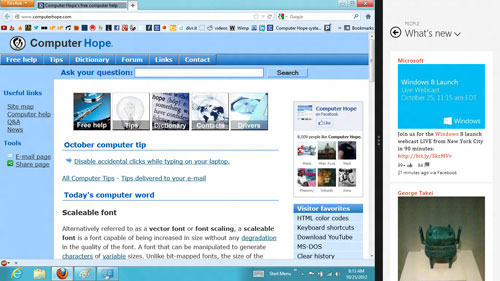
Any app can be pinned to the left or right-hand side of the screen. For example, open the People app and then press the Windows Key + . (period) to move that app to the right-hand side of the screen, pressing the same keys again will move it to the left-hand side, and pressing the same keys again will make it full screen. While an app is pinned, any other app or program can be opened and loaded into the available space on the screen. For example, in the below picture, we've opened a browser window and have the People app running to monitor our social networks.
Windows 8 People
Any open app can also be pinned using your mouse by clicking at the top of the tile and dragging it to the left or right-hand side of the screen.
Bonus tip: The Desktop can also be pinned to the left or right-hand side of the screen.
Note: In order for snap to work properly your resolution must be at least 1,366 x 768.
Windows 8 Task Manager
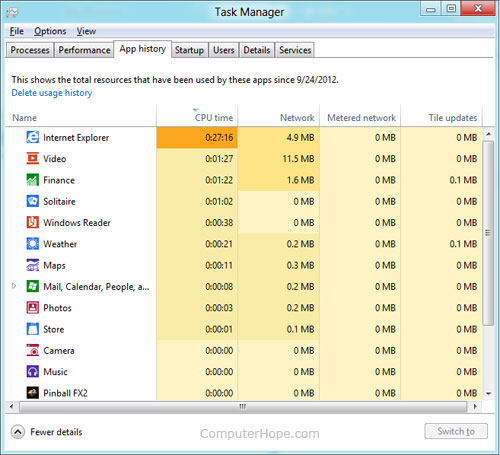
The Windows 8 Task Manager has been significantly improved over previous versions of Windows. Some of the new changes include showing a total percent usage at the top of your Processes, which makes it easier to determine total memory and CPU usage, improved Performance graphs, a Startup tab to see startup processes and their impact to system performance, and the App history tab (as shown below) that gives you the total resources an app has used over a period of time. Press Ctrl + Shift + Esc to start exploring the new Task Manager.
Windows 8 Task Manager
Use a picture password to log into your computer
Windows 8 includes a new feature called Picture password, which allows you to authenticate with the computer using a series of gestures that include circles, straight lines, and taps. Enable this feature if you want a new way to access your computer or have a hard time with passwords.
  1. Open the Windows Charms.
  2. Click Settings and then More PC settings
  3. In the PC settings window click Users and then select Create a picture password
Bonus tip: A four digit pin password can also be created and used to access your computer.
Take advantage of Windows 8 apps
Windows 8 comes included with several apps to help you get the most from your computer. Below are just a few of the included apps.
People
Microsoft touts the People feature in Windows 8 because they understand how many people are using social networks today. In the People feature you'll be able to connect your Windows computer to all the major social networks including FacebookLinkedIn, and Twitter. Once connected, you can pin the people app and monitor your social network (as shown below), use People in Search to find people, and get an overview of what is happening in all your social networks.
Windows 8 People
Reader
The Reader app will give you PDF support right out of the box.
SkyDrive
The SkyDrive app will give you access to the Microsoft cloud service SkyDrive, which allows you to store your photos, documents, and other files in the cloud and access or share those files with any computer with Internet access.
Store
Take advantage of the Windows Store and install one or more of the thousands of available apps designed for Windows 8. The Store is found in the Start screen, or use Search to search the Store app for any apps that you are trying to find

Sunday, December 4, 2011

How To Recover Lost or Deleted Data

Many think that their life is doomed when they lose all their data that has been stored on their hard disk, but this is not the case. There are number of ways to recover the  data that you think is lost forever, and this will require some level of technical knowledge, and specific softwares to perform such actions. One such software is PC Tools File Recover 8, which is a tool that can been used to recover your photos, music and much more in ease.
recovery software
File recover is a safe, affordable and easy to use recover solution, which is designed to recover and restore deleted files from hard drives, floppy drives and other kinds of fixed media. It helps you to recover critically lost documents and other files that have been deleted by accident. Some of the ways by which these documents are lost will include emptying recycle bin, or by using methods that by pass recycle bin like Windows Shift-delete, command line deletion and by use of applications that can delete files. You will not be able to recover these files by using Windows Operating system, but you will not know until you get your File Recover that the file still remains on the drive and is intact for you to recover using this File Recover tool. What File Recover tries to do is to attempt to reconstruct as much as of the file possible with the contents intact.
Some of the worth mentioning features of File Recover to recover lost data will include:
1.     The recovery of files instantly from hard drives, floppy disk drives and any other types of fixed media. This is one of the best data protection strategy to prevent the loss of your data, as they act as a filler of critical gap in protecting your data, you be either a home user or a network administrator.
2.     They have a rapid scan engine that has a typical hard drive and the files are scanned for being recovered within minutes.
3.     They have the accessibility to scan all files and directories on the selected hard drives.
4.     They search for the lost file by using part of the file’s name or the entire phrase of the file’s name, while I personally believe the former is advantageous as you do not miss out the file.
5.     They use a non-destructive, read only file recovery approach, which means that you can use other file recovery tools if this fails, and none of your intact files will be disturbed.
6.     Can recover files in batches at a single go.
7.     They even scan the dish at bad sectors to look for recovering files, where many of the other files recovery programs fails.
8.     They support IDE/ATA/SCSI hard drives, which will also include drives larger than 8 GB.
9.     They also support the following filing systems – Windows FAT 16, FAT 32, and NTFS.

uCoz – Free Website Creator

Thinking of starting a new website but you don’t have any knowledge of programming it. Then you must try out uCoz.com. They are the world’s leading online site builder and to add to this they are free. The website takes care of all the layout and design and expects you to take control of the content and other aspects related to the site. Many would perceive this as another web blogging platform but I would like to say that the website is much more than a typical blogging platform like WordPress. You can create a business site, personal site or a blog with uCoz.It is one of the bestfree website maker.
create-free-website-ucoz
The user interface is simple and interactive and doesn’t demand any expertise of HTML and CSS from your side. The service and platform provided by the uCoz is free of cost and it is because of these features and commitment level that has earned a good reputation of by them in the market. The company claims to be running more than 1 million websites and offer unlimited web storage and bandwidth. Some of the salient features of this website are:
1. It offers free website design with more than 250 themes and designs that are available your website.
2. Variety of modules and plugins that can be installed on your site as the need arises. The standard installation will have only 12 modules but they can be changed later on. Several other modules for polls, news, RSS, etc. can be added also.
3. The site has 99.9 % uptime that has regular backups and several other options can be availed from them.
There are also some downsides which they need to work upon are:
1. No support for the custom scripts which are programmed in PHP, JSP or any other scripting language. This limitation needs to be worked upon by the site.
2. Another limitation which is felt by me is the SEO. There are a million sites so there is an urgency to keep your site unique and differentiated from them.
3. The website that will be made will have a number of advertisements that will clutter up all the free space. Some of the advertisement may have inappropriate content and are not suitable for young and sensitive viewers.

How to Make Facebook Safe


 Is Face book safe? Yes, if you use the new Facebook privacy controls. Facebook makes a perfect vehicle to network with your friends. You can share personal information with people you trust. However, without the necessary Facebook privacy controls, all private data will be accessible. Someone can simply find your Facebook account by Googling your name. Luckily, Facebook privacy controls has introduced settings to give you more control of what information is accessible.
You may think simply solely giving your information out to trusted friends will be enough to in sure that private information is safe. However, this is a mistake. Your Facebook profile is logged in search engines thus making it available to millions. Even your updates are public information. Facebook privacy controls are a grand step in the right direction. This article hope to help you keep your Facebook details private.
How to Make Facebook Safe:
Step 1: Use Control Sharing
1. Click the Account menu located in the top right.
2. Click View Settings
3. Customize access by setting access controls
4. Select level of privacy options in the drop down menus
5. Save settings
You will have levels of access from everyone, friends only, friends of friends and anyone in your network. You may opt to use a more custom setting. However, friends only is the most secure setting is the friends only option. To return to the first menu click “Back to Privacy” in the top left.
Step 2: Protect your Album
One of the most sensitive items to share is photos. To protect your photos from public viewing. Follow the instructions below
1. In the privacy settings window, click custom
2. Choose Customize settings.
3. Choose Edit album privacy
4. Select the privacy option to control who has access to your photos
Step 3: Bury Your Contact Information
Your contact information can be easily found on Facebook as well as search engines. All someone has to do is enter your name in a search engine to find you and your Facebook page. You can stop this by using the public search option.
1. Under Contact Information, select the option for drop down menus to “only me”
2. Go back to Privacy, Click Back to Privacy
3. Click Edit your settings, under Applications and website, un-check pubic search
Remember to treat your personal data as a precious commodity. Your information can be mined and sold to the high bidder or simply stolen and exploited by spammers. Using the Facebook privacy controls, should give you a whole new level of security.

Share

Twitter Delicious Facebook Digg Stumbleupon Favorites More